Digital Storytelling
Contents
Digital Storytelling
Digital storytelling as a broader term involves the use of technology to convey stories. There are various mediums to tell these stories, such as text on a website or social media platform, images and narration in a video, or audio narration in a podcast.
Digital stories are not simply presentations of facts with accompanying visuals; they are carefully crafted narratives that take the audience on a journey. Like novels or documentaries, digital stories have elements such as plot, characters, and themes.
Digital Storytelling in Education
With an everincreasing use of digital media, digital storytelling is of high importance in the field of education, to facilitate engagement of scholars by creating dynamic and interactive narratives. The use of multimedia elements like images, videos and narration can lead to a more immersive experience, promoting creativity and critical thinking. Furthermore, digital storytelling helps to convey essential skills of digital literacy!
Living Documents
Expaning on digital storytelling, there is a growing usage of “living documents” which utilize technology to create dynamic, constantly evolving narratives. These living documents are documents that can be updated in real-time, with new information and perspectives added as they emerge.
In the realm of science, living documents are becoming increasingly important tools for sharing information and promoting collaboration among researchers. For example, scientists may use living documents to create a comprehensive database of research studies on a particular topic, which can be updated in real-time as new studies are published. This can help researchers stay up-to-date on the latest findings and identify areas where further research is needed.
Living documents are also particular relevant in the field of open science, where researchers share their data and methodologies openly and collaboratively. Living documents can be used to create a shared repository of data, which can be updated as new data becomes available. This can help promote transparency and collaboration, as researchers can work together to analyze and interpret the data in new and innovative ways.
There are many potential avenues to create living documents.
Tips on Creating engaging Media
There are a couple things you can look out for using better digital storytelling:
For further information on how to use digital storytelling, check out this awesome walkthrough from which these tips have been adapted
Make sure of conceptualizing your story using the dramatic arc
Narrate your story in your own voice.
Use different types of media like images, videos, and narration
Choose a tool, that helps you creating great stories
Jupyter Books
One amazing way to create living documents is Jupyter Book.
Jupyter Books provides a flexible and powerful platform for creating, publishing, and sharing your work. Additionally, Jupyter Book allows you to combine live code, equations, visualizations, and narrative text in a single document. This makes it easy to create engaging, interactive educational content that helps students understand complex concepts.
Creating content using Jupyter Books is a simple process and we have created a tutorial on how to use Jupyter Books!
Tutorial on Jupyter Book
Installing the prerequisites Before you start setting up your course using Jupyter Book, make sure you have the following tools installed on your machine:
Git: A version control system that helps you keep track of your code changes.
Jupyter Book: A tool that helps you build and publish interactive books or documents. You can install Jupyter Book using pip install jupyter-book.
A text editor of your choice: You can use any text editor, such as Visual Studio Code, Sublime Text, or Atom, to create and edit your content.
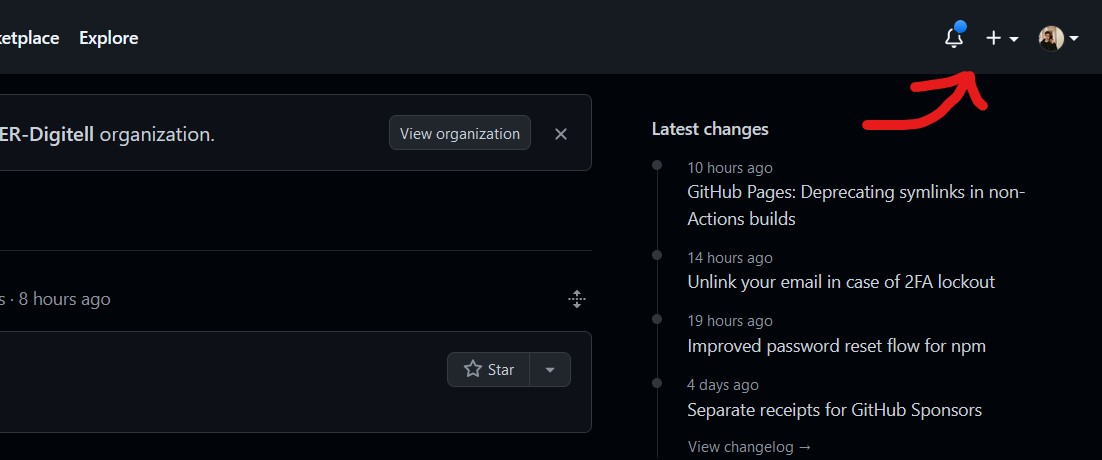
Create a fresh Git Repository for your project 2.1. Go to the GitHub website (https://github.com) and click on the plus button on the upper right corner.

2.2. Create a new repository for your course by giving it a name and a description.

2.3. On GitHub, open up the empty project in your browser.
Navigate to
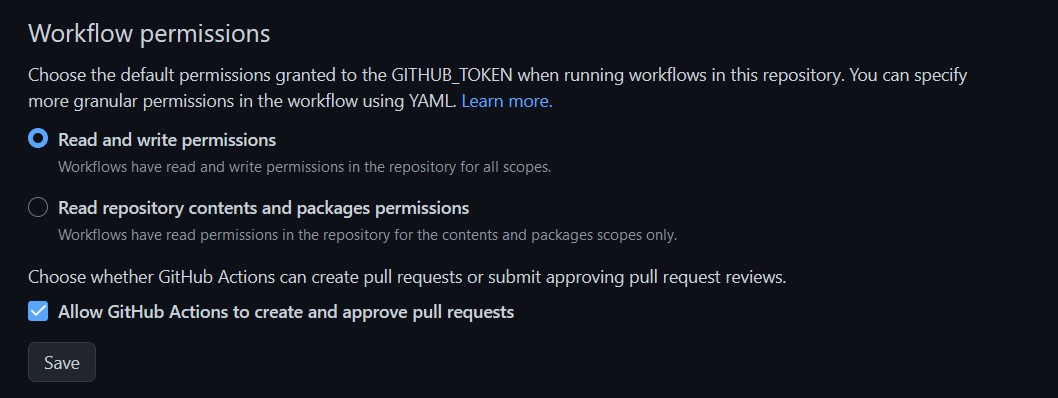
settings,actions, thengeneralto change Workflow permissions to Read and Write Permission to change the Workflow permissions to Read and Write Permission. This will allow you to push changes to the repository from your local machine.

2.4. Save your changes.
2.5. Open up a terminal window and navigate to the location where you want to store your local course copy.
2.6. Copy the project’s link and clone the repository using the following command: git clone https://github.com/yourprojectname.
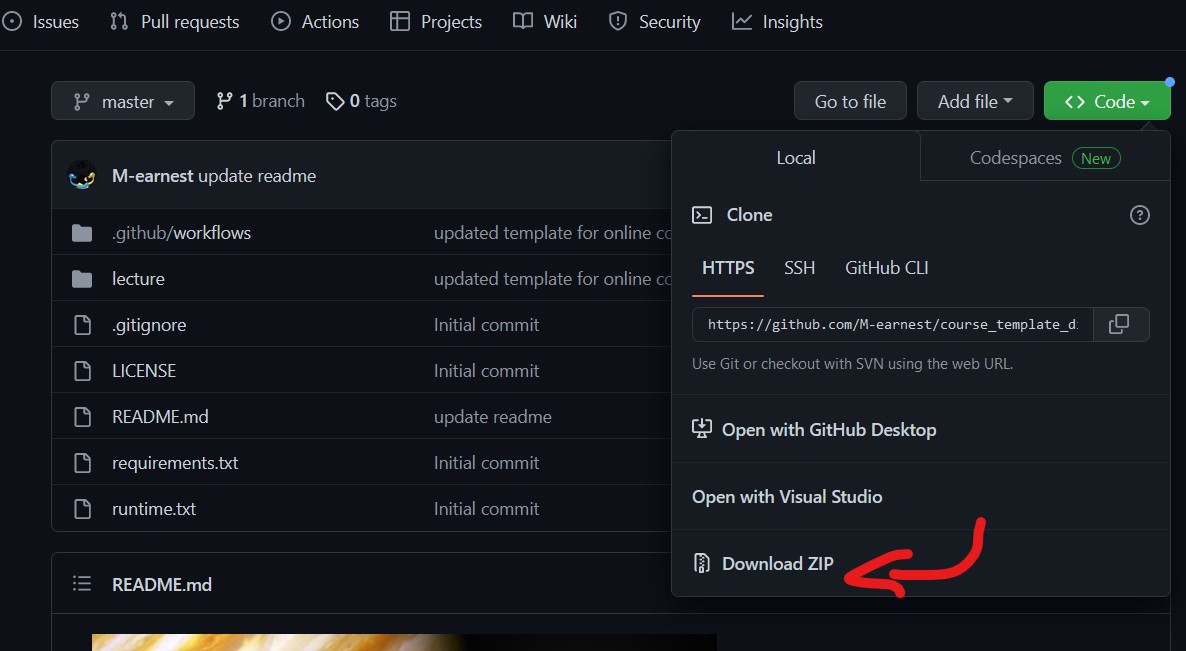
open our course template repository
click on
codeand then on Download ZIP
Extract the contents of the ZIP file in the folder linked to your GitHub repository.
Open the Markdown (.md) or Jupyter (.ipynb) files and copy your interactive content and code.
Make sure to give each file a meaningful name and add a title to each page.
You can use the provided style guide as a reference to see how to effectively implement MyST Markdown.
Once you’ve created files, open the
_toc.ymladd your newly created files in the sequence of your choice according to our template
open the
_config.ymlChange the title, author, and the location of your GitHub repository.
In your terminal, navigate to the location of your project and type the following commands:
a. )
git add .b. )
git commit -m "my first commitc. )
git pushAlternatively use the Gitkraken Client
Add the pages
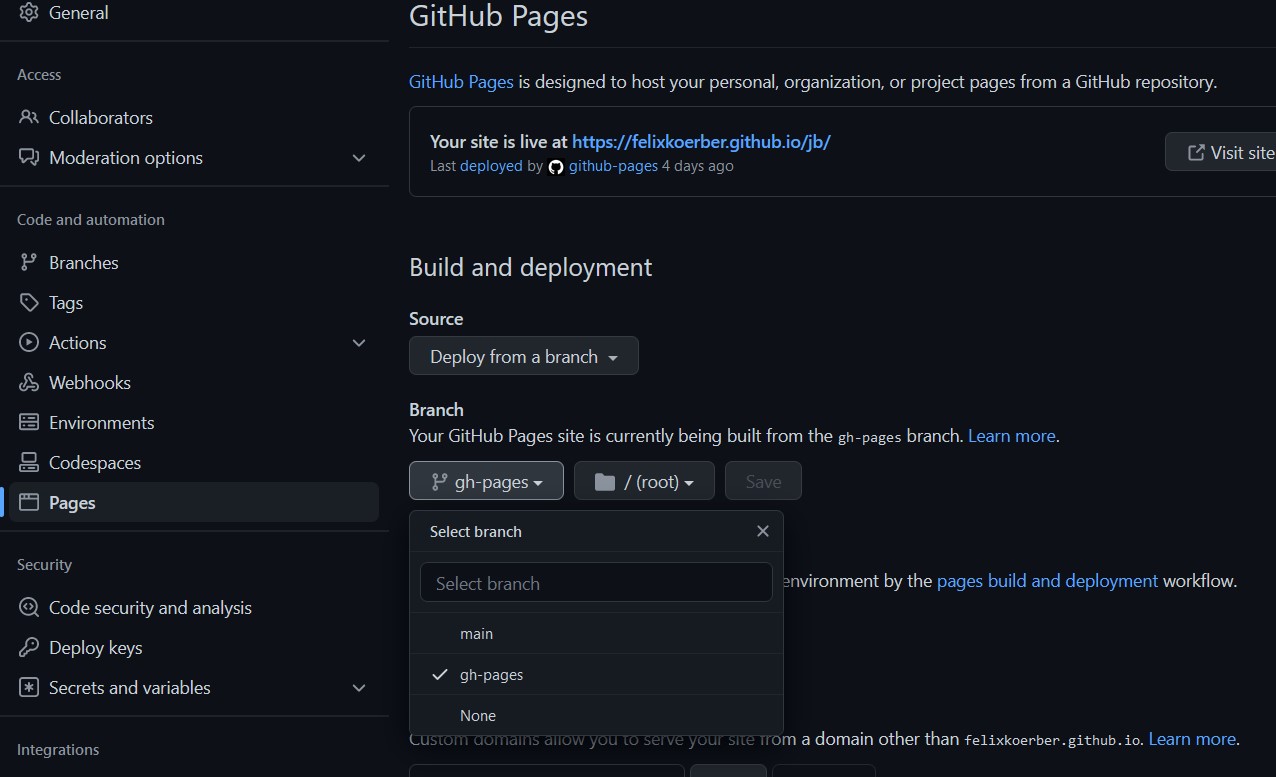
On Github, navigate first to
settingsand thenpagesClick on
branchand selectgh-pages
 You’re all set! Once you’re ready, make sure to make your repository public, so that others can view your beautiful website.
Note
GitHub Pages is a free web hosting service provided by GitHub. It allows one to easily publish websites directly from a GitHub repository. With GitHub Pages, you can create static websites, blogs, and even project portfolios without having to worry about managing servers or purchasing web hosting.
You simply create a repository in GitHub and push your website files (HTML, CSS, JavaScript, etc.) to the repository. GitHub Pages then automatically generates the website and makes it available at a unique URL. This URL is typically in the format “username.github.io/repository-name”.
GitHub Pages makes it relatively easy to host your own website for developers and programmers, e.g. this course, but can be confusing for non-technical users. A workaround for non-technical users is to work with a preconfigured setup. Our workgroup for example has created a template that you can use to host a website like the one you’re seeing right now. This is achieved by using a so called “github-worklflow”. Checkout our tutorial for creating a website using Github pages here
Closing Words
Overall, digital storytelling has become an important tool for educators looking to engage students in meaningful, creative projects. By providing a platform for students to explore and express their ideas in new and innovative ways, digital storytelling can help to promote empathy, understanding, and positive change in the classroom and beyond.

