Online version control: GitHub
Contents
Online version control: GitHub
The following lesson will contain information on
how to setup you public Github account,
how to setup a project (your course in this case) on github contained in github “repository”,
how to use the version control software “Git” to manage your projects and how to “push” your local materials to an online repository.
To learn more about the accompanying version control system for Git check out the previous Lesson: Intro to Git
Goals
This chapter aims to include the following goals. Do check back here later and you feel like the lesson addressed the stated goals appropriately!
Understand the benefits of using Github
Learn how to setup your Github account
Learn how to record changes via git
Learn how to setup and connect local and online (remote) repostiory
learn how to submit my changes to an online repository
Roadmap
What’s Github and why should you use it? (skip this if you’re already familiar with the concept
Setting up a Github account
Start a project/setup a public repository
Setup your local machine for working with Git/Github
Git Operations
Git Workflows
What’s a “Github” and why should we use it?
As already mentioned, Github is a web-based plattform for store, organize, and managing projects.
Content is mainly organized in repositories (or “repos” for short), these repos can be viewed as being equivalent to a normal directory, that you have on your local machine for e.g. storing data, pictures. They may contain a variety of file-types and nested directories, and will be used as a place to store and organize your project files, including code, assets and documentation
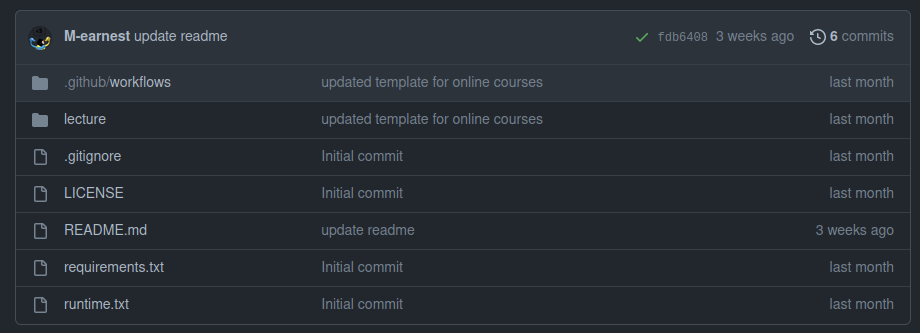
Here you see the repository for the course template that you’ll be working with. Don’t worry if that’s still confusing to you, learning how to work with Github is best done using a “learning-bydoing” approach.
Version control and collaborative work
I’m sure we’ve all lost important document, code or progress while working in academia. If you’ve been doing programming work, you might also have encountered that fixing a bug may lead to other substantial bugs down the line. People generally tend to come up with their on solution for “project managment”, like maintaining multiple files with different suffixes added, e.g. project_working_copy_1.txt, project_notes.txt, project_final_draft_3. Another approach involves making a mess out of a documents by storing cut or to be implemented content in it’s own sub-section at the end of e.g. project_draft_4.txt.
Github alleviates that problem by making use of “Git” a distributed version control system, which logs each time a change is made to a file. Via the commit system we can not only maintain different versions of the same file on e.g. your local system and the connected public repository, but also revert changes that had negative consequences or recover information lost on your system.
Git further makes it easy to work with multiple users on the same project, as each user can maintain their local versions and submit their changes to the public directory, that can then be reviewed by the team on quality and compatibility and subsequently be incorporated into the online project.
Setting up a Github account
First things, first let’s setup a GitHub Account.
1. Go to the GitHub website: Open a web browser and navigate to the github.com.
**2. Click on the “Sign up” button located in the upper-right corner.
3. Fill out the registration form: Fill out the required information and choose a username. Choose your username carefully, as your username will be included in the link to the website we’re going to build and will be publicly displayed!
4. Verify your email address: Check your email inbox and click on the verification link sent by GitHub.
5. Customize your profile: Fill out your profile information. This will help others to find and connect with you on GitHub.
And that’s it! You can now use your new GitHub account store your code online or collaborate and share your projects with the world!
Start a project/setup a public repository
Let’s put that new account to use, by creating a new online repository, often referred to as a “remote repo”!
Open Github in your browser
Click on the
+sign in the top right corner and click “New repository”Fill out the repository details: Give your repository a name, description, and check the box next to “public” to make sure others can find your directory.
This could look something like this:

Check the box “Add a README file”, this will initiate your repository with a file that can later be used to display basic information to others viewing your repo.
Choose a license! You can start out with “None” as this repo is just for testing, but if you plan to use Github for your projects it’s imperative to include one to prevent misuse. Find more info here.
Click on the “Create repository” button to create your new repository.
Now you can add files to your repository by clicking the “Add file” button by either uploading them or creating a new file.
Congratulations! You are now the proud owner of a Github repository. In the following parts we’ll be diving a bit deeper into the specifics of how a standard Github-Workflow might look like, how to connect your local system to your online repos (“cloning”).
Setting up Git
Now you can simply upload files to your GitHub repository, but usually a GitHub is connected to a local repository on your machine. So let's review how to Setup Git, to make use of the full capabilities of GitHub.
If you’ve already done the previous lesson - Intro to Git - you may skip this section.
To use Git on your local machine to log any changes you make to your project and submit your changes to the internet, you’ll be needing the following:
a GitHub account
Bash
We’ve already discussed how to setup a Github account and create an online repo. How to get the rest of the listed software is explained in detail in our complete Setup section.
Bash is used in command-line interfaces for interacting with the operating system. In essence Bash can be seen as a programming language with the main purpose of navigating the file system, manipulating files and directories, runnning programs, and automating tasks using scripts and workflows.
It is mainly used in scientific computing and data analysis for it’s ability to automate complex workflows and control flows of large datasets, but it’s further essential to use the version control system Git from the command line. Find out more about in our chapter Unix Shell and Bash
You may not need Bash and instead opt install the Gitkraken client, a software package icnluding a Graphical-user-interface to manage all your git/Github projects. If you’re not too familiar with coding or simply prefer to have a visual overview over the exact changes you’ve made, your version history etc. this might just be the better choice for you.
Simplye downlowad and install the Gitkraken client and conncet it to your online Github profile.
Check if you’re ready
Can you open a text editor? (e.g., Linux: gedit, nano. macOS: textedit. Windows: notepad)
Can you go to your GitHub account?
A.)When you open a terminal on your system and typegit --version, does it output the version number? (macOS / Linux: you might need to run this:conda install -c anaconda git)or
B.)Open Gitkraken and create a new repository (called intiating a new repository, under “Start a local project”)
Getting started
Now getting started with Github may feel overwhelming, but for this course we’ll be learning just the bare minimum.
If you’re confused about the language used or want to understand things in greater detail, there are great ressources ou there for you to explore:
Git operations
Git can be quite complex, but we’ll only be using the following operations, for in-depth explanations in video form click the contaned links:
Forking: Creating a copy of someones repository, that you want to work with. Forks let you make changes to a project without affecting the original repository. I.e. you’ll create an online copy of anothers repository under your github account.
Cloning: Meaning to create a local copy of an online repository (called “remote”s on your system.
Branching: Meaning to create a copy of a project either onliny or locally, so that you have an isolated copy where you can work without affecting other branches in a repository. Each repository has one default branch, usually called “main” branch, and can have multiple other branches.
Comitting: A commit is a “snapshot” of your repository at one specific point in time. If you make changes to a repository, you’ll have to follow up with “comitting” the changes to save file changes to your Git repository. This does not mean that your changes will be lost, if you e.g. shutdown your system just that the version between a file on your system and the logged version in the github repository do not match.
Pulling: Means simply to update you local repository with the corresponidng online (remote) repository. E.g. if you’ve or someone else made changes to the online version of a repository you pull or “download” these changes to your local files this way.
Pushing: Git push is used to upload a local repository’s content to a remote repository. Meaning that you send your locally comitted changes to your online repository.
Git Workflow
A standard Git workflow may be looking something like this:
1. Create a repository: Create an online repository by clicking on the “New repository” button on the GitHub website. Give your repository a name, a description, and select it the “public” option.
2. Clone the repository: To start working with your repository, you’ll need to “clone” it to your local computer. This will create a copy of the repository on your computer that you can work with. To clone a repository, click on the “Clone or download” button and copy the URL.
BASH: Open a terminal or command prompt and input the following command: git clone https://github.com/username/repositoryname.Where username is your user name and repositoryname is the name of your of the repository.
Gitkraken: Click on file, clone repo and input where the repo should be stored on your system as well as the URl to the repo, i.e. https://github.com/username/repositoryname.
3. Make changes: Now that you have a local copy of the repository, you can make changes to the code. Simply open the files in your editor and make the changes you want or create new files and folders.
4. Commit changes: When you’re done making changes, you’ll need to “commit” them to the repository. Committing a change records it in the repository’s history and makes it part of the codebase.
BASH:To commit a change, run the following commands one after the other in the terminal (replace “Your commit message” with a brief description of the changes you made)l:
git add .
git commit -m "Your commit message"
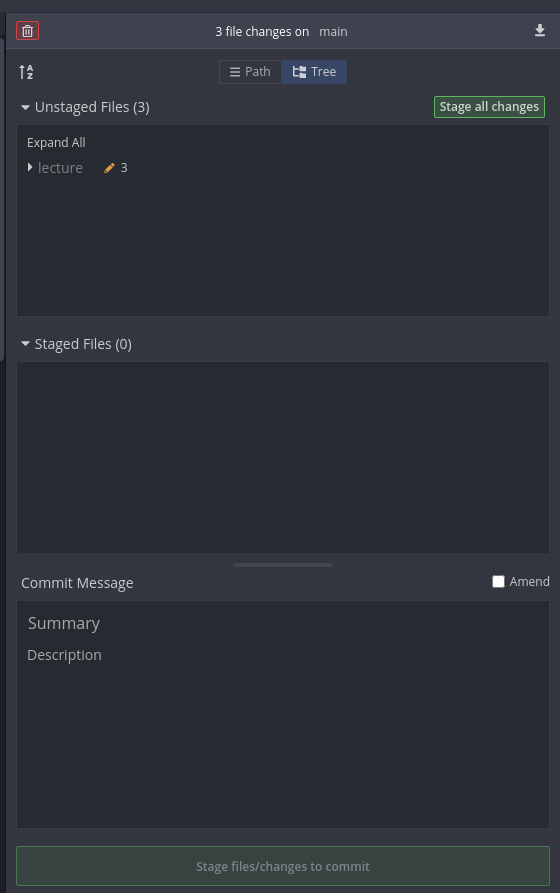
Gitkraken: Click on file, open repo and select the repo containing your changes. On the left hand side you’ll see the “file” overview. Under unstaged files you can review your changes. Click the grenn “stage all changes” button or right click on inidvidual files/folders and select “stage”. The files will be added to the “staged” files windows. Following provide a name for your changes (commit) in the summary field below and add a short but meaningful description of your changes. Lastly, hit the green “Stage changes/changes to commit” button.
5. Push changes: Finally, you’ll need to “push” your changes to the remote repository on GitHub. This will upload your changes to the website so that others can see them.
BASH: To push your changes, run the following command: git push origin master.
Gitkraken: Hit the “Push” button on the upper center of the window.